assorted-vegetables-1656666

Why, Which, and How to use All of Your Veggies

Let’s start with the why. Why should you use all of your vegetables? And what does that even mean?

The answer is pretty simple: because it produces less waste and saves you money. What I mean by “use all of your veggies” is to use as much of the vegetable as you can. This means leaving the skin on when possible (potatoes, tomatoes for soups/sauces, carrots – they don’t even have “skin” but lots of people still take off the outer layer – etc.)

Which vegetables can I use entirely?

Lots and tons! I won’t name every single vegetable but here’s some that you might not have thought of using the whole thing:

Broccoli – Yes, even the stem. Chop it up into smaller bite sized pieces or shred it and add it to your dish (salads, roasts, soups, etc). Broccoli is absolutely delicious!

Caulifower – Just like broccoli, you can chop up the stem to use in soup, on the grill, in the oven, or on the stovetop. You can even steam it and just add butter! 

Carrot – There’s no need to shred off the outer layer of a carrot. The only part you shouldn’t eat is the very top (where the leaves normally come from). If there are little strings coming off the bottom, either pull them off or eat them. If you wash the top those, you can use it in a smoothie or soup (especially if you like to make your own veggie broth).

Celery – Try to eat as much of the celery as possible. The leaves of celery you use in soup/broth, a roast, a stir-fry or even eat them in a salad (choppped up or whole). The only part you might not want to eat is the base. Place the base of the celery into a glass container with a little bit of water on the bottom. Continue to water and watch as a new celery grows. Then, you can plant it in a small amount of dirt or keep it growing in your water.

Tomatoes – You don’t really have the cut out or off the top of the tomato. Just chop it up with the rest of the tomato and enjoy! This would be great for salads, soups, and even sandwiches.

Pretty much every vegetable – If there are parts that you don’t want to eat, wash them and freeze them. Once you have enough, boil them in water with your favorite herbs and make your own vegetable broth. This is another great use for your celery leaves!

To make your own vegetable broth with leftover vegetables, simmer your vegetables in a large pot with water and spices for about an hour (really, the longer the better). This will allow the flavor to really develop. Good spices for soups include: mixed herb, garlic, rosemary, bay leaves, thyme, and parsley. You can also add tomato paste or a can of tomatoes. 

Pro tip: you may want to sauté garlic and onions in olive oil (additional not just what was leftover) before adding the rest of your vegetables and water.

To read more about my recipes and why I create them the way I do (without specific measurements, times, and temperatures) check out this blog post. Post a picture of your soup and vegetables to your stories on Instagram and tag me (@its.mary.taylor) so I can see and share it to my story too!

If you enjoyed reading this and would like more information on home, lifestyle, advice, tips, tricks, and more, follow me on Instagram @Its.Mary.Taylor and on Facebook at Mary Taylor! I can’t wait to see you there!

Signing off,

Mary Taylor <3

Salad_003

Bacon & Chicken Spinach Salad

Have you ever just thrown a bunch of food together and it actually turned out amazing?! This was exactly one of those times! I love eating salad but only when it’s filled with pretty much everything besides the kitchen sink. This recipe is seriously so easy and delicious. It’s also packed with amazing nutrition and healthy ingredients!

To read more about my recipes and why I create them the way I do (without specific measurements, times, and temperatures) check out this blog post

Here’s what you need:


  • Spinach
  • Cooked and sliced chicken (we made ours in our Crockpot express – check it out here)
  • Crispy bacon
  • Chopped apples
  • Feta chunks
  • Fresh squeezed lemon
  • Sunflower seeds
  • Pumpkin seeds
  • Sesame seeds
  • Linseeds
  • Olive oil (we love garlic flavored olive oil because it gives it extra flavor and a kick – plus, garlic is great for your immune system)

Like all other salads, just mix it all together and ta-da! How easy is that?! 

What’s your favorite salad to make at home? Post a picture of your salads to your stories on Instagram and tag me (@its.mary.taylor) so I can see and share it to my story too!

If you make this recipe, please tag me on Facebook or Instagram so I can see your creations!

If you enjoyed reading this and would like more information on home, lifestyle, advice, tips, tricks, and more, follow me on Instagram @Its.Mary.Taylor and on Facebook at Mary Taylor! I can’t wait to see you there!


Signing off,

Mary Taylor <3

3

DIY Eco-Friendly Products You Can Make At Home

I’ve always been interested in living as eco-friendly as I possibly can but the last few years I have been even more committed to making it part of my lifestyle. This year we ditched single-use paper towels, tissues, baby wipes, makeup removing wipes, and so much more! We are even in the process of getting rid of liquid soaps. Love eco-friendly ideas just as much as me? You can check out my Eco-Friendly Home Swaps blog here!

This blog post contains affiliate links. I may make a small commission from purchases you make from this blog but I cannot see who purchases you what. You are NOT charged anything additional for using my links. It helps me continue to provide you with fun and interesting blog posts, shopping tips, and suggestions. Thank you for your support. 

Not only can you reduce your grocery bill and weekly spending by creating your own products at home, you can also help the planet! Did you know that more than 552 million shampoo bottles could be ending up in landfills every year?

Here are a few simple eco-friendly home recipes you can easily make from home!

Check out my Amazon list for where to buy some of the ingredients and “tools” (spray bottles, jars, etc), you’ll need to make these eco-friendly products at home!

All purpose cleaner: You’re going to be shocked at how easy this recipe is! You can read the full blog with the recipe here.

Conditioner with apple cider vinegar: Did you know that apple cider vinegar stimulates hair growth and prevents hair loss? It also has antibacterial and antifungal properties. You can make your own apple cider vinegar conditioner by adding apple cider vinegar and water to a spray bottle. After shampooing, spray the apple cider vinegar mixture into your hair and wait one minute. Then, rinse it out! If you want to make it smell better, add a few drops of your favorite essential oils. Please make sure you’re using pure essential oils without synthetics – especially when applying to your skin in any way.

Dishwashing tablets: Here’s what you need:

2 cups of baking soda

2 cups of sodium percarbonate or washing soda

½ cup of citric acid

½ cup of white vinegar

20 drops of essential oil

(Optional) ½ cup of salt

Mix your dry ingredients then add your vinegar slowly. Mix well and add essential oils of choice (some great options include: lemon, peppermint, tea tree, cinnamon, and lavender). Place your mix into an ice cube container and let sit for 24 hours until hardened. Be gentle when using them as they won’t be as tough as the ones you buy from the supermarket.

Bug spray: All you need to make your own bug repellent is 30 drops of essential oils, witch hazel, water, and alcohol (rubbing alcohol or vodka)! Some good essential oils for bug spray include: lavender, lemon eucalyptus, citronella, lemongrass, peppermint, and tea tree. Find these oils on Amazon here. If you’re NZ or AUS based and would like help finding where to purchase these products, please reach out to me via Instagram. Please make sure you’re using pure essential oils without synthetics – especially when applying to your skin in any way.

Which of these were your favorite eco-friendly products that you can make at home? I plan to add even more tips and suggestions for DIY eco-friendly products so don’t forget to pin this blog post and come back later to find more ideas and inspiration.

If you make this recipe, please tag me on Facebook or Instagram so I can see your creations!

If you enjoyed reading this and would like more information on home, lifestyle, advice, tips, tricks, and more, follow me on Instagram @Its.Mary.Taylor and on Facebook at Mary Taylor! I can’t wait to see you there!

Signing off,

Mary Taylor <3

Apple Cinnamon Roll

Apple Cinnamon Roll Bites

One thing I miss about living in Encinitas is the local bakery and Cinnabon. I am not going to lie, Cinnabon is definitely a guilty pleasure of mine. And although my homemade apple cinnamon roll, pull apart “bread” isn’t the same, it IS delicious and super easy to make (which kind of just makes it that much better, right).

This is the perfect homemade cinnamon roll recipe if you don’t have premade dough (or crescents) handy and you don’t have any yeast. You can even use this same recipe and roll out the dough, fill with apples, and place in the oven the same way but more “cinnamon roll looking.” The “pop open” premade “cans/jars” aren’t really common here so I had to find something that I could easily make with what I already had at home.

To read more about my recipes and why I create them the way I do (without specific measurements, times, and temperatures) check out this blog post

Here’s what you’ll need:

Apple Cinnamon Roll Bites

Who doesn't love cinnamon sugar and butter with apples and buns?! Yum!

Equipment

  • Oven

Ingredients

  • Apples Sliced or Diced
  • 2 cups Flour
  • 1 tbsp Baking powder
  • Salt
  • 1/2 cup Butter Cold - Cubed
  • Butter Melted
  • Brown Sugar
  • Cinnamon
  • Granulated sugar
  • Icing sugar
  • Milk
  • Cream cheese

Instructions

  • First, combine flour, baking powder, and salt into a bowl and mix it together. Sometimes I like to add in a bit of extra sugar and cinnamon to the recipe so I add it directly to the dough.
  • Then, cut in cubes of butter and add it to the bowl. Make the bits of butter as small as possible.
  • Gradually stir in milk until the dough comes together (be careful that it doesn’t get too wet and sticky - if it does, just add more flour)
  • Preheat oven (350 degrees F - if you like to know that kind of stuff) and grease your pan with butter.
  • In a medium bowl, mix together granulated sugar, brown sugar, and cinnamon.
  • Cut apples into thin slices. Optional: squeeze lemon juice onto the slices and mix well.
  • Now, this part is kind of up to you, I like to reduce the number of bowls I use so I do this next part in the greased pan but you can also do this in a separate bowl.
  • Melt butter (either just add extra to your existing greased pan or have a separate bowl), make small balls of dough, and roll the dough balls into the melted butter.
  • Then, roll the dough balls in the cinnamon and sugar mixture until they’re well coated.
  • Line the bottom of the buttered pan with apples and/or place apples inbetween the dough balls.
  • Place the dough balls next to each other (touching) in the buttered pan.
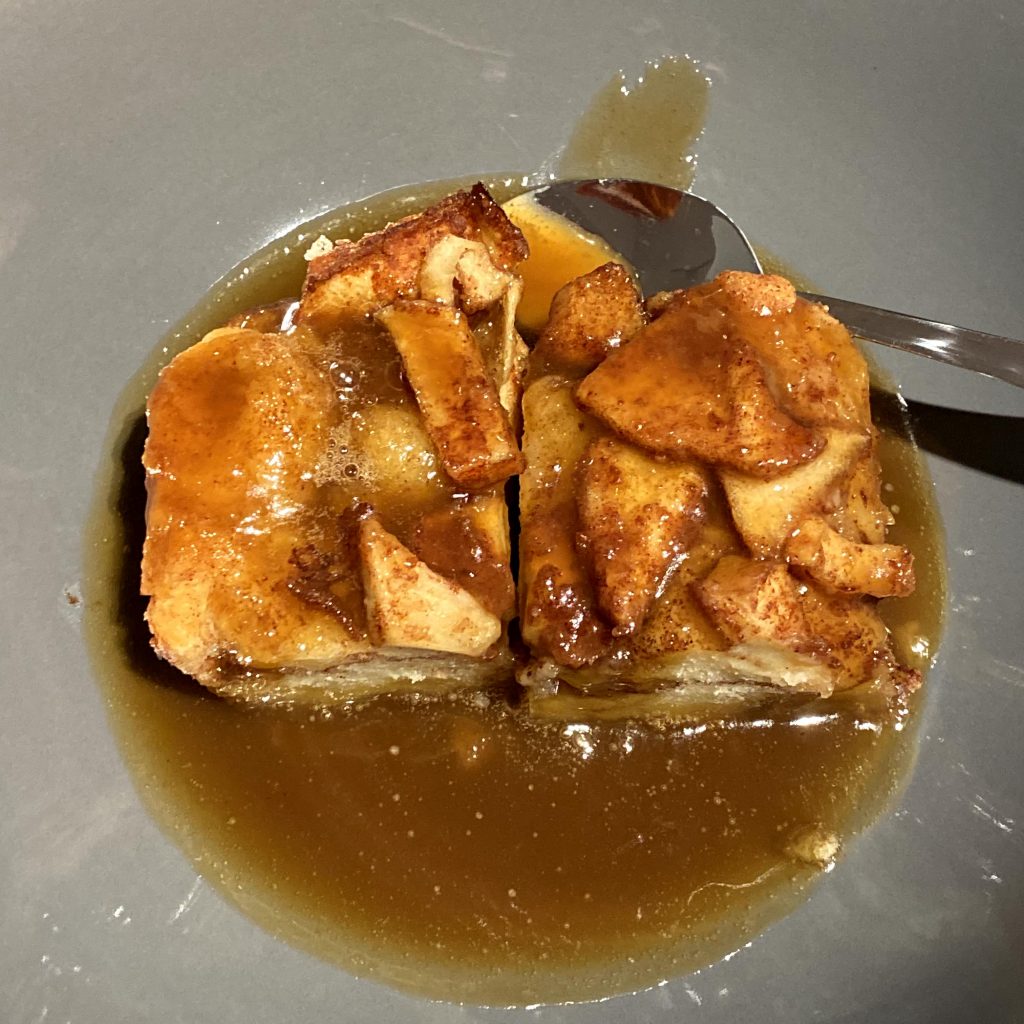
  • Cook for 7-10 minutes or until dough is cooked all the way through.
  • While they’re cooking, make your chosen sauce!

Caramel Sauce

  • Melt butter and brown sugar in a sauce pan with a little bit of milk. Don't let the liquid get too hot for too long. Keep stirring until it slightly thickens. Remove from heat and pour on cinnamon rolls. Optional: Add cinnamon!

Easy Icing

  • Mix milk, vanilla, and icing sugar until desired consistency.

Cream Cheese Frosting

  • Mix cream cheese, vanilla, and icing sugar until desired taste and consistency. If you prefer it a bit thinner, add a touch of milk.

If you make this recipe, please tag me on Facebook or Instagram so I can see your creations!

If you enjoyed reading this and would like more information on home, lifestyle, advice, tips, tricks, and more, follow me on Instagram @Its.Mary.Taylor and on Facebook at Mary Taylor! I can’t wait to see you there!


Signing off,

Mary Taylor <3

birthday_023

Birthday Weekend on Waiheke Island

It’s my birthday! Well, it was. And here’s a little bit about how it went!

Have you ever been to Waiheke or heard of it before? If not, this is the perfect blog for you!

I’m in the process of writing another blog about love languages but one of my greatest love languages is quality time! Robbie, my husband, knows me so well – he spent the several days leading up to my birthday with me exclusively. That’s a norm for us but this was EXTRA special because we got to take a vacation to Waiheke Island near Auckland, New Zealand. We had been wanting to go to Waiheke for over two years!

We started our long weekend with a trip to Auckland for the night so we didn’t have to wake up too early for our ferry ride the next morning. Robbie surprised me with the most romantic dinner ever at the Sky Tower (the restaurant is called Orbit 360°). WOW! The food was incredible and the prices weren’t actually bad for all that’s included (portions, the view, and access to the Sky Tower itself). We will 100% be going back.

I even figured out how to wrap my infinity dress is a new way and matched my beautiful Mesamie NZ earrings with it! Mesamie gifted me three pairs of earrings for my birthday and I wore one pair every day to celebrate. They were all so comfortable and unique. Find me on Instagram to see even more pictures of me wearing them! 

The next morning we woke up bright and early, walked to Krispy Kreme (which BTW if you sign-up for their email list you get free donuts on your birthday – I am going to add all the New Zealand birthday freebies that I got to my Deals Directory so you can check them out). It was Robbie’s first time at a Krispy Kreme and it definitely didn’t disappoint! 

Our ferry ride to Waiheke Island was NUTS. The water was so stormy, we were bobbing up and down like crazy. I actually said, “I can’t believe it’s legal to be on the water when it’s like this!” 

It was a bit calmer on shore and as soon as we arrived, we headed off to our zip line adventure on Waiheke Island! There were only three zip lines but to get back to the start, we got to hike through their private forest which was filled with natural wildlife (especially birds)! The best part of the zip lining tour/adventure, besides the zip lining itself, was that all of the proceeds from our tickets went to helping restore the forests natural habitats.

After zip lining, we headed to our Airbnb to get ready to continue our day with a few wine tastings. We went to everything from a smaller commercial tasting to a gorgeous, homely Italian winery to a beer and wine tasting at a larger restaurant/winery. One thing that I found really interesting about Waiheke was that every winery was SO different. You never knew what to expect!

The Italian winery, Poderi Crisci, was like something out of a movie. Imagine this: the moment you step out of your car you’re transported to an Italian chef’s backyard – you walk through his renaissance style garden lined with raised garden beds filled with vegetables and herbs that he uses for his dishes. You see a handmade swing hanging from the tree tops and as you sit down and lift your feet, you feel the fresh breeze flow through your hair as you gaze at the mountains, trees, and vineyard. You’re welcomed into the chef’s kitchen to enjoy a beautiful wine tasting accompanied by fresh baked bread and homemade olive oil. As you walk inside you immediately smell the freshly picked daffodils on the table. Each time the doors open, you hear the clinking of his pots and pans that are hanging from the ceiling on an old metal gate. 

The rest of the weekend was spent tasting wine, exploring the island, eating beautiful food, and having plenty of more tours!

One major highlight of our time in Waiheke was with head chef and winemaker, Connie Festa from Peacock Sky. We had our first and only Degustation Wine Tasting! What is does degustation mean? Degustation is “the careful, appreciative tasting of various food, focusing on the gustatory system, the senses, high culinary art and good company.” Connie says, “[Degustation] is the fine art of food and wine pairing!”

Connie prepared several small bite sized dishes to accompany the wine we were tasting. The pictures don’t do it justice. We felt like royalty in our private tasting room as we got to hear directly from the chef herself. 

We loved hearing about Connie’s journey of opening Peacock Sky, her love of cuisine, and all of the wonderful classes and events she hosts (everything from cooking classes and tours to hen’s dos and weddings)! She even sell their divine brownie as a mix so you can make it at home!

We left Waiheke feeling like we had checked off everything we wanted and more. The saying, “Time flies when you’re having fun,” couldn’t have been more true. On Monday morning, we packed our things and headed back to the Ferry to spend the day in Auckland. We didn’t get a chance to go to the top of the Sky Tower after dinner, so we went up on Monday! We had the whole place to ourselves which was absolutely magical. We shopped and hit up all the birthday deals we could before heading back home (with a stop off to see Robbie’s parents).

If you’re following me on Instagram, you might have seen that on top of the incredible weekend that Robbie put together, I also got a wine fridge (which I have been wanting for a long time) and a distiller (thanks dad)! 

Thank you SO much to everyone involved in making my birthday weekend so special! I couldn’t have asked for anything more beautiful.

If you enjoyed reading this and would like more information on home, lifestyle, advice, tips, tricks, and more, follow me on Instagram @Its.Mary.Taylor and on Facebook at Mary Taylor! I can’t wait to see you there!

Signing off,

Mary Taylor <3

FREE Social Media Tips & Tricks

person-holding-green-vegetable-beside-orange-fruit-3737698 (2)

Tips for Eating Healthy While on a Budget

Today we’re going to talk about budget-friendly grocery shopping and eating healthy while on a budget. Eating healthy doesn’t have to be expensive (and sometimes, it can actually be cheaper). 

1. Buy frozen veggies – they’re usually cheaper!

2. Only buy the meat and veggies that are on sale – then bulk freeze

3. Ditch the processed drinks (if you love soda, get a SodaStream and add in fresh lemon, essential oils, or other fresh fruit to your bubbly water)

4. Simplify recipes and use what you already have

5. Buy in bulk

Some of the links included in this blog are commissioned links. This means I may earn a small commission when you use them. I cannot see who purchases what and it doesn’t cost you anything to click on them.

6. Use all of the veggie (for the ones that you can)  – check out this blog for more info

7. Buy dried garlic (in bulk) instead of fresh garlic

8. Make sure what you do buy doesn’t go off. Wasting food is a HUGE expense not only to your bank account but also to the environment. 

9. Start a garden! Growing your own food is not only great for your wallet but also for the environment. Here’s a gardening kit to help you get started. You can even grow your own herbs.

10. Only buy what’s on your list. When you’re growing shopping, make sure to stick to your list. Even when you see something you really want. Only buy it if you need it.

11. Meal plan so you know exactly what you need for each meal. This means less waste and less money spent. It also helps you eat healthier. Check out these (cheap but awesome) reusable meal prep containers!

12. If buying rice, buy brown rice. Brown rice has more fiber and antioxidants, as well as a lot more important vitamins and minerals.

13. Skip the bread and potatoes and go for something healthier (carrots, broccoli, cauliflower, nuts, etc).

14. Buy whole uncooked chickens instead of chicken breasts, etc. (make sure it actually works out to be cheaper)

15. Bulk cook (by bulk cooking you’re not only reducing your time in your kitchen but also your electric/gas bill).

16. Ditch the unnecessary items (chips, candy, chocolate, ice cream, etc. – swap chips for veggies and hummus, tzatziki, etc. – swap store bought ice cream and desserts for homemade coconut pudding). This way you know exactly what you’re putting into your body and you can alter the ingredients to fit a healthier lifestyle. 

Do you have any other shopping or cooking tips you can give us? We would love to see you in our FREE shopping and deals group: https://www.facebook.com/groups/marytaylorshopping/

If you enjoyed reading this and would like more information on home, lifestyle, advice, tips, tricks, and more, follow me on Instagram @Its.Mary.Taylor and on Facebook at Mary Taylor! I can’t wait to see you there!

Signing off,

Mary Taylor <3

SodaPress_Mary_Taylor_005

Dry July Mocktail Recipes

Not only is it Plastic Free July, it’s also Dry July! This is the perfect time to try out some fun mocktail recipes!

To read more about my recipes and why I create them the way I do (without specific measurements, times, and temperatures) check out this blog post

All images copyrighted © Mary Taylor LTD

First of all, what is Dry July?

In general, dry July means you go alcohol free for the entire month of July. In New Zealand, Dry July is a fundraiser that challenges you to go alcohol-free and raise funds for New Zealanders affected by cancer.

And, what’s a mocktail?

A mocktail is a “non-alcoholic mixed drink is a cocktail-style beverage made without alcoholic ingredients.”

As an Amazon associate, I may earn from qualifying purchases. However, I cannot see who purchases what.

For this Dry July, I thought I would come up with some fun mocktail ideas (and hey, if you’re reading this and it’s not Dry July anymore, feel free to turn these into cocktails instead). I’ve partnered up with the Soda Press Co. to bring you the yummiest, healthiest, and freshest mocktail recipes! Throughout my recipes, I used a SodaStream for our sparkling water. You can purchase your own SodaStream here. If you’re US based and want to purchase Soda Press syrups and concentrates, you can do so here. Check out my full list of cooking and drinks favorites here.

I made three mocktails: a blueberry & lime mocktail (inspired by a blueberry margarita), a passionfruit & mandarin mocktail (inspired by a fruity sangria), and a raspberry & mint mocktail (inspired by a berry mojito). I’ve also included a few extra recipes from Soda Press Co. (you can grab their free recipe book directly on their website).

Blueberry & Lime Margarita Inspired Mocktail:

Ingredients

  • Fresh or frozen blueberries
  • Fresh lime or lime essential oil
  • Soda Press Co Blueberry & Lime Syrup
  • Sparkling water
  • Jalapeños* (optional)
  • Blueberry simple syrup* (optional) 
  • Tequila* (for a cocktail not a mocktail)

Instructions

1. Muddle blueberries with lime juice (if you’re making a cocktail instead of a mocktail, now is when you should add in your tequila)

If you don’t have a cocktail shaker, you can even use a jar! These ones are perfect for single serving drinks.

If you want to sweeten it up or take things to the next level, add a homemade blueberry syrup with fresh or frozen blueberries and sugar. Add a little bit of water if needed. Reduce this on a stove until you have a thick syrup consistency.

2. Want to make it spicy? Add in a jalapeño (either whole, chopped, or muddled with the blueberries)! This mimics a blueberry jalapeño margarita.

3. Depending if you prefer the “pulp” and skins or not, you can strain out the liquid and throwaway the skins. Note that there may not be very much liquid if you’re not adding any tequila.

4. Fill your glass with ice and pour your muddled fruit, Soda Press Co syrup, and your sparkling water into the glass.

5. Top with blueberries if you choose and enjoy!

Alcohol-Free Passionfruit & Mandarin Sangria

Ingredients

  • Soda Press Co passionfruit & mandarin kombucha concentrate
  • Fresh fruit (oranges, passionfruit, berries, cherries, pineapple, lemons, etc)
  • Sparkling water (only if making mocktail)
  • Mint* (optional)
  • Wine (white wine or rose recommended) or bubbly wine of choice* (to make a true sangria instead of an alcohol-free sangria)
  • Add in triple sec* (for cocktail not mocktail)

Instructions

1. Cut your fresh fruit into small pieces (if applicable) and place in a jar.

2. Add desired amount of Soda Press Co passionfruit & mandarin kombucha concentrate.

3. Add in sparkling water or wine/bubbly wine and triple sec.

4. Add sugar or simple syrup if needed.

5. To meld the flavors together (specifically if using alcohol), let your creation sit in the fridge for a minimum of 30 mins.

6. Pour in glass, top with mint, and enjoy!

Raspberry & Mint Mojito Mocktail:

Ingredients

  • Soda Press Co raspberry & mint syrup
  • Fresh mint
  • Sparkling water
  • Fresh or frozen raspberries
  • Lime juice or lime essential oil
  • Simple syrup* (optional if you feel it needs a bit more sweetness)
  • White rum* (if making a cocktail not a mocktail)

Instructions

1. Muddle fresh mint and raspberries with a dash of water. If you’re making a cocktail instead of a mocktail, add white rum instead of water.

2. Strain your mint and raspberries (if you choose) into your glass.

3. Put a dash of Soda Press Co raspberry & mint syrup.

4. Mix well and shake well!

5. Fill the glass with ice and top with sparkling water.

6. Add fresh mint and raspberries if you choose. 

A few extra recipes:

“WHERE MY ROSEMARY GOES” Pink Grapefruit & Rosemary Mocktail:

  • Soda Press Co Pink Grapefruit Soda Syrup
  • Sparkling Water
  • Pink Grapefruit Slices
  • Sprig of Rosemary

“Green Thumb” Elderflower & Cucumber Mocktail:

  • Soda Press Co
    Elderflower Soda Syrup
  • Sparkling Water
  • Lemon Juice
  • Cucumber Slither Garnish

“Gran’s Remedy” Kombucha & Apple Mocktail:

  • Soda Press Co
    Elderflower Soda Syrup
  • Soda Press Co original kombucha
  • Lemon Juice
  • Sparkling Water
  • Half a Granny Smith Apple (chopped)
  • Apple Fan Garnish

If you make any of these recipes, please tag me and Soda Press Co on Facebook or Instagram so we can see (and share) your creations! You can find Soda Press Co on Facebook here and Instagram here.

If you enjoyed reading this and would like more information on home, lifestyle, advice, tips, tricks, and more, follow me on Instagram @Its.Mary.Taylor and on Facebook at Mary Taylor! You can find all my recipes on Pinterest here. I can’t wait to see you there!

If you’re looking for your own blog post or professional images check out my services here. And don’t forget to sign up to my mailing list here to get monthly tips, tricks, and deals.

Signing off,

Mary Taylor <3

stainless-steel-fork-on-white-ceramic-plate-4686826

Coconut Chocolate Pudding Recipe | Vegan Coconut Frosting Recipe

One night we were making a chocolate cake when I realized we didn’t have anything to go on top! We didn’t have cream cheese, butter, sour cream, or whipping cream.

As usual, I looked around the kitchen trying to see what I could turn into frosting. I wanted something creamy and rich. That’s when I thought of a vegan coconut chocolate frosting using coconut cream. There are so many ways you can change up this recipe too. Make it vanilla flavored instead of chocolate, add in a different kind of sweetener (like maple syrup or stevia), or even use other extracts or essential oils to make it peppermint, strawberry, or citrus flavored. 

Feel free to experiment and let me know what you do to make it yours! Do you prefer it to be stiffer and colder? What additions or changes did you make to the flavors?

If you want to use coconut milk instead of coconut cream, just put your coconut milk in the fridge for 1-3 days before you use it. There are a few benefits of using coconut milk instead of coconut cream. Coconut milk hardens more when chilled and yields about twice as much as coconut cream. I used coconut cream for my recipe and loved it. Plus it was the perfect amount for a full cake. But, use whichever you prefer or have around. 

As an Amazon associate, I may earn from qualifying purchases. It doesn’t cost you anything extra and I cannot see who makes purchases.

To read more about my recipes and why I create them the way I do (without specific measurements, times, and temperatures) check out this blog post.

Vegan Coconut Pudding Recipe | Vegan Coconut Frosting Recipe

Course: Dessert
Keyword: cake, chocolate, frosting, pudding, sweet

Equipment

  • Stovetop
  • Pot
  • Something to stir
  • Freezer safe container
  • Oven (optional)
  • Whisk or Electric Whisk (optional but preferred)

Ingredients

  • Unsweetened Coconut Cream or Coconut Milk Chilled
  • Cocoa Powder
  • Coconut Milk / Liquid from Coconut Cream
  • Chocolate To Melt
  • Sugar
  • Shredded Coconut Optional
  • Vanilla or Other Extract Optional

Instructions

  • Make sure that your coconut cream is chilled. If you weren't able to put your coconut cream in the fridge overnight, place it into the freezer for around an hour. Make sure that it isn't mixed or shaken.
  • Scoop off the top of the coconut cream and place it into a freezer safe container. Leave the liquid in the bottle of the can.
  • Turn on oven for shredded coconut (you can toast the coconut now or later - see below).
  • In a pot on the stove, melt chocolate with a little bit of coconut liquid from the coconut cream can. You can also use coconut milk if you prefer.
  • Add in cocoa powder. Continue to constantly mix!
  • Add in your desired amount of sugar * you can use coconut sugar, powdered sugar, or regular sugar. For a smoother texture, make sure if you use a coarse sugar, like regular sugar, that it melts completely. You can do this separately to make a simple syrup and add that in. If you're using this as a frosting, you may need more sugar but if you're eating as a pudding, you may want less sugar.
  • Let cool for a little while (but make sure the chocolate doesn't solidify).
  • While the mixture is cooling, put your shredded coconut into the oven to bake. It will be done once it's at a golden brown color. Watch it closely!
  • Then, pour the chocolate mixture into the bowl with the coconut cream and whip/stir.
  • Even if the coconut cream melts, keep whipping/stirring until all of the ingredients are blended. Now is a good time to taste test it and see if you need more sugar. Then, place the mixture into the freezer until it solidifies more. If you want it to be fluffier, you can take it out and whip it more or leave as is (depending on your preference and what you're using it for).
  • Then, sprinkle toasted coconut ontop and enjoy!

If you make this recipe, please tag me on Facebook or Instagram so I can see your creations! 

If you enjoyed reading this and would like more information on home, lifestyle, advice, tips, tricks, and more, follow me on Instagram @Its.Mary.Taylor and on Facebook at Mary Taylor! I can’t wait to see you there!

Signing off,

Mary Taylor <3

WeddingPlanningGroup

Chickpea & Bean Tomato “Curry”

I shared this recipe on my Instagram story a few weeks back and I got so many people asking how to make it! This recipe is super easy, quick, gluten-free (unless you eat it with naan), vegan, and versatile. You can make it spicy (or not). Feel free to change it up by adding more veggies or beans. It’s easy to save and eat cold or reheat. It’s the perfect meal prep dish!

To read more about my recipes and why I create them the way I do (without specific measurements, times, and temperatures) check out this blog post

Chickpea & Bean Tomato "Curry"

Course: dinner, Main Course
Cuisine: Indian, Mexican

Equipment

  • Pan
  • Stovetop

Ingredients

  • Chickpeas Canned
  • Other Beans of Choice I added red kidney beans but another great choice would be mixed beans or white beans
  • Canned Tomatoes
  • Onions Chopped
  • Spinach
  • Garlic Minced/Pressed
  • Cumin
  • Parsley Fresh or Dried
  • Paprika
  • Olive Oil
  • Salt
  • Pepper
  • Cayenne Pepper Optional

Instructions

  • Sauté onions and garlic in a pan on the stove.
  • Add in the rest of the ingredients. Cook until the water has almost evoporated completely and the sauce has thickened.
  • Towards the end, add in spinach and cover the pan so that the spinach becomes slightly cooked/steamed.
  • Serve with rice, quinoa, or naan. Or skip the extra carbs altogether and serve on a bed of argula.

Notes

Saute onions and garlic first then add the rest of the ingredients. You want to cook until it reduces down (water evaporates so it’s thicker). Then add in spinach and cover with a lid to trap in moisture/slightly cook the spinach. 
We served this with sweet potato/kumara puree and homemade naan but you could also serve it with rice (brown rice for a healthier option) or quinoa.

If you make this recipe, please tag me on Facebook or Instagram so I can see your creations! 

If you enjoyed reading this and would like more information on home, lifestyle, advice, tips, tricks, and more, follow me on Instagram @Its.Mary.Taylor and on Facebook at Mary Taylor! I can’t wait to see you there!

Signing off,

Mary Taylor <3

egg-avocado-cooking-tomato-106877

The Story Behind My “She’ll Be Right” Cookbook

One day my husband turned to me while we were in the kitchen and said, “You should write a cookbook! But not just any cookbook. A cookbook designed for the way that YOU cook!”

You’re probably wondering what that means – how is my cooking and are my recipes any different?! Well, you see, I use recipes as inspiration not as directions. It might sound crazy but temperatures and measurements aren’t really a thing in my “book”. The closest thing I can compare it to is the kiwi mentality and phrase, “She’ll be right!” (Which you can learn more about here). In the case of cooking, if you add a little bit too much of this or a little bit less of that, it doesn’t really matter because it’s probably still going to taste good.

I have a massive passion for cooking and have ever since I was little. I remember standing on a small Spanish table just so I could reach the counters as I was helping my dad chop tomatoes with a dull knife. My dad is the chef of the family and when I say chef, I really mean it (although he would humbly say he “just cooks”). From the most amazing chili to homemade pasta sauce and marinated meat, he knows how to do it all. Growing up I even thought I wanted to be a chef (professionally not just for friends and family) but I’ve since decided that I would love to keep it as a passion and not as a profession.

Picture of the top of the table I used to stand on when I was little

Over the last couple of years I have shared pictures of my food on Instagram and on my Facebook page and people started to ask for recipes. Although I’m not much of a recipe girl, I’ve decided to start a cooking section of my blog. Some day, it might even become a real cookbook! It will be different than any of the other cooking blogs or recipes you’ve seen before because I won’t be using traditional methods of measurement. Sometimes you might not even see any measurements. Cooking to me is more than just about what’s on the page. It’s about learning what flavors and combinations go together. It’s a unique experience with food and ingredients. There’s no one perfect way to make anything. Someone who tries your food might say it’s just right while others may say it’s too salty, too sweet or too spicy. You may be allergic to something or just not like it at all. Use my recipes as an inspiration and a guideline not as directions. Here are some dishes you can look forward to seeing posted on my blog soon!

I hope you have fun reading my recipes and making them for yourself. I can’t wait to see what you come up with! If you try any of my recipes please tag me in any pictures you post and feel free to message me about how you liked it (and don’t forget to send me pictures)! You can check out all my blog posts with recipes here.

You can follow me and message me on Instagram @its.mary.taylor and follow me on Pinterest to save my recipes to your own boards. Don’t forget to like me on Facebook to get the latest updates on blogs and stay connected. Happy cooking!

Signing off,

Mary Taylor