stainless-steel-fork-on-white-ceramic-plate-4686826

Coconut Chocolate Pudding Recipe | Vegan Coconut Frosting Recipe

One night we were making a chocolate cake when I realized we didn’t have anything to go on top! We didn’t have cream cheese, butter, sour cream, or whipping cream.

As usual, I looked around the kitchen trying to see what I could turn into frosting. I wanted something creamy and rich. That’s when I thought of a vegan coconut chocolate frosting using coconut cream. There are so many ways you can change up this recipe too. Make it vanilla flavored instead of chocolate, add in a different kind of sweetener (like maple syrup or stevia), or even use other extracts or essential oils to make it peppermint, strawberry, or citrus flavored. 

Feel free to experiment and let me know what you do to make it yours! Do you prefer it to be stiffer and colder? What additions or changes did you make to the flavors?

If you want to use coconut milk instead of coconut cream, just put your coconut milk in the fridge for 1-3 days before you use it. There are a few benefits of using coconut milk instead of coconut cream. Coconut milk hardens more when chilled and yields about twice as much as coconut cream. I used coconut cream for my recipe and loved it. Plus it was the perfect amount for a full cake. But, use whichever you prefer or have around. 

As an Amazon associate, I may earn from qualifying purchases. It doesn’t cost you anything extra and I cannot see who makes purchases.

To read more about my recipes and why I create them the way I do (without specific measurements, times, and temperatures) check out this blog post.

Vegan Coconut Pudding Recipe | Vegan Coconut Frosting Recipe

Course: Dessert
Keyword: cake, chocolate, frosting, pudding, sweet

Equipment

  • Stovetop
  • Pot
  • Something to stir
  • Freezer safe container
  • Oven (optional)
  • Whisk or Electric Whisk (optional but preferred)

Ingredients

  • Unsweetened Coconut Cream or Coconut Milk Chilled
  • Cocoa Powder
  • Coconut Milk / Liquid from Coconut Cream
  • Chocolate To Melt
  • Sugar
  • Shredded Coconut Optional
  • Vanilla or Other Extract Optional

Instructions

  • Make sure that your coconut cream is chilled. If you weren't able to put your coconut cream in the fridge overnight, place it into the freezer for around an hour. Make sure that it isn't mixed or shaken.
  • Scoop off the top of the coconut cream and place it into a freezer safe container. Leave the liquid in the bottle of the can.
  • Turn on oven for shredded coconut (you can toast the coconut now or later - see below).
  • In a pot on the stove, melt chocolate with a little bit of coconut liquid from the coconut cream can. You can also use coconut milk if you prefer.
  • Add in cocoa powder. Continue to constantly mix!
  • Add in your desired amount of sugar * you can use coconut sugar, powdered sugar, or regular sugar. For a smoother texture, make sure if you use a coarse sugar, like regular sugar, that it melts completely. You can do this separately to make a simple syrup and add that in. If you're using this as a frosting, you may need more sugar but if you're eating as a pudding, you may want less sugar.
  • Let cool for a little while (but make sure the chocolate doesn't solidify).
  • While the mixture is cooling, put your shredded coconut into the oven to bake. It will be done once it's at a golden brown color. Watch it closely!
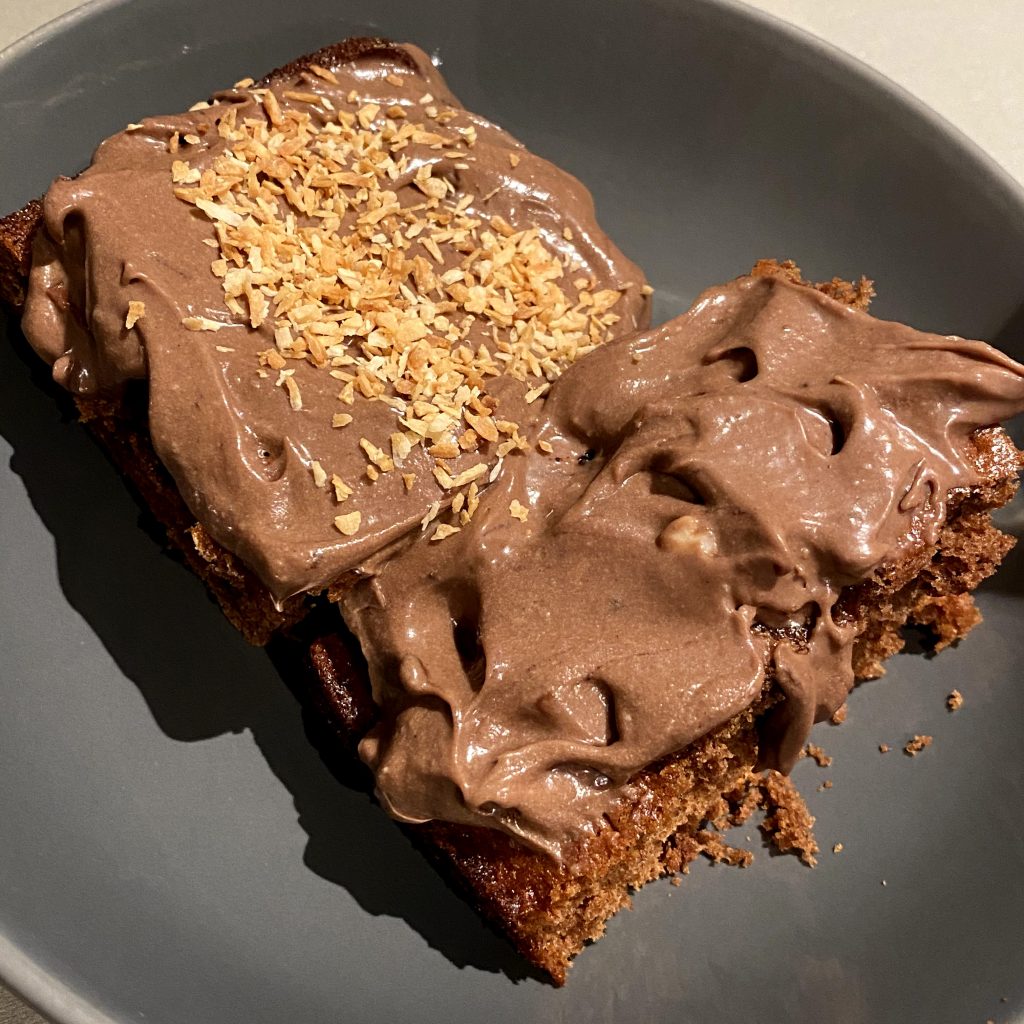
  • Then, pour the chocolate mixture into the bowl with the coconut cream and whip/stir.
  • Even if the coconut cream melts, keep whipping/stirring until all of the ingredients are blended. Now is a good time to taste test it and see if you need more sugar. Then, place the mixture into the freezer until it solidifies more. If you want it to be fluffier, you can take it out and whip it more or leave as is (depending on your preference and what you're using it for).
  • Then, sprinkle toasted coconut ontop and enjoy!

If you make this recipe, please tag me on Facebook or Instagram so I can see your creations! 

If you enjoyed reading this and would like more information on home, lifestyle, advice, tips, tricks, and more, follow me on Instagram @Its.Mary.Taylor and on Facebook at Mary Taylor! I can’t wait to see you there!

Signing off,

Mary Taylor <3

Learn how to make

DIY Natural All-Purpose Cleaning Spray

While we lived with grandparents (and parents), I kept thinking about the day we would finally be in our own place so I could start living as eco-friendly as possible. One thing about being an adult is getting excited for weird things like organization and DIY cleaning products. Surely I am not alone! There’s just something special about an eco home. In our rental, we tried our best (only produced 7 bags of trash a year and used “eco-friendly” products) but I wanted to take it the next step. This meant no paper towels, no tissues, no makeup wipes, and no more purchasing cleaning products that I could make (which is pretty much all of them)!

As an Amazon associate, I may earn from your purchases through my links; however, it doesn’t affect how much you pay and I cannot see who makes a purchase.

So the journey really began. I stocked up on glass bottles, which if you’re US based, you can purchase here. And I set out to make my own DIY natural all-purpose cleansing spray with what I had at home. You’re going to be shocked at how easy this recipe is.

Here’s what you need to make your own DIY citrus cleaning spray:

✧ Glass Jar With Lid – buy here

✧ Citrus Peels (we used lemon & orange) *tip below

✧ White Vinegar – buy here

✧ Spray Bottle – buy here

✧ Strainer

✧ Purified Water (optional)

✧ Essential oils (optional)

And here’s what you do with all that:

✧ Put your citrus peels in your glass jar

✧ Fill the jar with vinegar to cover the peels 

✧ Put the jar lid on & shake

✧ Let sit for up to 7 days (minimum 3 days) in a cool, dark place – Shake the jar every day if you remember

✧ Strain the vinegar into your spray bottle

✧ Toss out the peels (or even better, put them in your insinkerator/garbage disposal to clean the inside of your sink & freshen it up)

✧ Optional: add in water to fill your spray bottle or if your vinegar is too strong you can add water

✧ Store in a cool, dark place and use on everywhere from your kitchen to your bathroom

** Extra tip… Enjoy the fruit first! To create even less waste, make this from orange and lemon peels you would have otherwise just thrown away. 


If you learned something new and enjoyed this blog, don’t forget to like me on Facebook and follow me on Instagram. I would love to see your homemade DIY cleaning sprays you make so tag me so I can reshare!

Signing off,

Mary Taylor